Host a Tor Relay

If you want to support the Tor project and you have some bandwidth to share (at least 10 Mbps in both directions, i.e. download and upload) you might consider hosting a Tor (Non-Exit) Relay. There are no legal implications as only fully encrypted Tor traffic is coming in outgoing on your internet connection. It can be done quite easily with a Raspberry Pi (needs at least 2 GB of RAM) or any similar hardware as described below.

Our assumption is that we connect the Raspberry Pi with an ethernet cable to our ISP router, it is running on Manjaro (Minimal version, also called ‚headless‘ i.e. no graphical user interface).

Install Tor

This is straighforward, just install it with:

sudo pacman -Syu tor

then we need to provide the configuration for it (keeping the default file as reference):

sudo mv /etc/tor/torrc /etc/tor/torrc.default
sudo nano /etc/tor/torrc

Our configuration for a Tor Relay will be something similar to:

NickName MyNewTorRelay
ContactInfo myemail@example.org

User            tor
AvoidDiskWrites 1
DataDirectory   /var/lib/tor
Log notice file /var/log/tor/tor.log

ORPort          4020 IPv4Only
ExitRelay       0
SocksPort       0

RelayBandwidthRate  42 Mbit
RelayBandwidthBurst 48 Mbit

The contact information is optional but might be quite handy for others if there should be something strange with the relay. It doesn’t have to be an email address but could be any kind of text.

In case you are running more than just one Tor Relay you have to also include a „MyFamily“ option in the config above and list all your key-fingerprints of your Tor Relays in each of the torrc config files. You get the fingerprint with

sudo -u tor tor –list-fingerprint

and remember that there must be a $ (Dollar-sign) at the beginning of each fingerprint.

Crucial: One might need to create the directories in the config file and make them owned by tor – they should look like:

drwx------  5 tor  tor  4096 Dec 31 09:47 tor

You should check that the syntax of the config file is correct with:

sudo -u tor tor --verify-config

Port Forwarding on ISP Router

In our example the Raspberry Pi (our Tor Relay) sits behind a router which is the gateway into the internet (often provided by the ISP). With the tor configuration above we need to establish port forwarding on this internet router, so TCP traffic coming from the internet (on port 4020) is forwarded to the Tor Relay (on the same ports).

If you would like to use other ports to the outside world (internet) than on the Tor Relay server itself, the Tor config file (torrc) needs to have something like:

ORPort 80 NoListen
ORPort 4020 NoAdvertise

The port forwarding on the ISP router then obviously has to forward port 80 to port 4020 on the Tor Relay.

The ports chosen are kind of arbitrary and we are free to take whatever we like. One advantage of advertising (i.e. using) ports 80 towards the internet is that they are very unlikely to be blocked as they are usually taken for http and https traffic. The drawback is that you can’t use these ports for something else (like a web-presence). Also some routers seem to have issues with port-forwarding these ports (e.g. lost after a router-reboot).

The details on how port forwarding is configured on the internet router depends heavily on that device but usually each of these kind of routers offers this feature somehow (just search the internet in case this is not obvious).

Start and Test it!

First let’s start Tor (so it picks up the latest configuration):

sudo systemctl start tor

Check the logs for what Tor does and if it complains about anything – the following commands might be useful to check for any errors:

sudo systemctl status tor.service
sudo cat /var/log/tor/tor.log
journalctl | grep Tor

You are perfectly fine if you see something like „Self-testing indicates your ORPort is reachable from the outside„. If there are no issues your new Tor Relay will also become visible on the torproject metrics-webpage at metrics.torproject.org/rs.html (this might take a few hours though, so be patient).

One could also increase the level of logging information written by tor. Just change the option in the /etc/tor/torrc configuration file – after the „log“ statement one could place either debug, info, notice, warn, or err. Additionally, one could (temporarily, for debugging) turn off the scrubbing of sensitive information in the log-files as well. So for debugging include something like the following in the torrc

SafeLogging 0
Log info file /var/log/tor/tor.log

Once running fine one should keep the logging at the ’notice‘ level though.

To permanently enable Tor running it needs to be enabled (so it will be started automatically after a reboot):

sudo systemctl enable tor

Also note that it takes up to 2 months until a new Tor Relay gets fully used – and since there is not always traffic available it will mostly never really run at the full possible bandwidth. See this article for some background on it: blog.torproject.org/lifecycle-new-relay.

Backup of Tor’s keys

If you want to be able to continue with the same Relay identity on another server (e.g. when moving servers of the server dies) one needs two key-files:

/var/lib/tor/keys/ed25519_master_id_secret_key
/var/lib/tor/keys/secret_id_key

If you ever set up a new Tor relay just overwrite the automatically generated key with these old ones and you new relay has the same identity as before.


Samba mit Linux

Um ein Verzeichnis mit Samba unter Linux im LAN freizugeben müssten folgende Schritte genügen. Zuerst installieren:

sudo apt install samba
sudo nano /etc/samba/smb.conf

und am Ende folgendes hinzufügen:

[Media]
	create mask = 0775
	directory mask = 0775
	force group = users
	force user = tom
	guest ok = Yes
	path = /mnt/media/media
	read only = No
	write list = tom

Zum testen der Konfiguration:

testparm

Setzen des leeren (kein) Passwords (nicht das Linux-Password!):

sudo smbpasswd -an tom

Um Samba dauerhaft zu aktivieren:

sudo systemctl start smbd
sudo systemctl enable smbd


NextCloud over Tor (onion service)

This guide is about how to set up a nextcloud instance running on a Raspberry Pi and providing the cloud service over Tor (a hidden service on the onion-network).

The initial setup of a new Raspberry Pi is always the same and described in some detail here: https://www.spaetzle.info/raspberry-server/

Install Tor

Let’s start with installing the tor package:

sudo apt install tor -y

Save the default config file as reference and create a new one:

sudo mv /etc/tor/torrc /etc/tor/torrc.default
sudo nano /etc/tor/torrc

and past in the following:

Log notice file /var/log/tor/notices.log

ExitPolicy reject *:*

TransPort 127.0.0.1:9040
DNSPort   127.0.0.1:5300

AutomapHostsOnResolve 1
AutomapHostsSuffixes .onion,.exit
VirtualAddrNetworkIPv4 10.42.0.0/16

HiddenServiceDir /var/lib/tor/services/nextcloud
HiddenServicePort  80 127.0.0.1:80
HiddenServicePort 443 127.0.0.1:443

If your running on an SD-Card (not recommended anyhow; if possible rather use a SSD-drive instead) you should add the following line to the config above:

AvoidDiskWrites 1

A crucial step is to manually create the directory for the hidden service:

sudo -u debian-tor mkdir /var/lib/tor/services/

After changing the config one should check the config, then restart the tor service and check the log file for warnings and errors:

sudo -u debian-tor tor --verify-config
sudo systemctl restart tor
cat /var/log/tor/notices.log

Firewall (nftables)

First install the firewall frontend and enable the firewall:

sudo apt install nftables -y
sudo systemctl enable nftables.service

Enable the following firewall rules, starting with a config file in your home directory

nano ~/nftables.conf

and paste in

#!/usr/sbin/nft -f

flush ruleset

table ip filter {
    chain input {
        type filter hook input priority 0; policy drop;

        iifname lo accept

        ct state established,related accept
        ct state invalid drop

        tcp dport ssh ct state new limit rate 10/minute accept
        tcp dport { http, https } ct state new accept

        icmp type echo-request limit rate 1/second accept
    }

    chain forward {
        type filter hook forward priority 0; policy drop;
    }

    chain output {
        type filter hook output priority 0; policy drop;
        oifname lo accept

        ct state established,related accept
        ct state invalid drop

        skuid "debian-tor" accept

        oifname eth0 udp dport ntp accept
        ip daddr 127.0.0.1 counter accept   # not needed ???
        ip daddr { 192.168.178.0/24, 192.168.200.0/24, 255.255.255.255 } accept
    }
}

table ip nat {
    chain input {
        type nat hook input priority 100; policy accept;
    }

    chain output {
        type nat hook output priority -100; policy accept;

        skuid "debian-tor" accept

        udp dport domain redirect to :5300
        ip daddr { 192.168.178.0/24, 192.168.200.0/24 } accept
        tcp flags & (fin | syn | rst | ack) == syn redirect to :9040
    }
}

and activate these firewall rules with

sudo nft -f nftables.conf

In case something goes horribly wrong (e.g. you lock ssh sessions) you can hard reboot the server and will start without the firewall rules.

Note that nft uses its own matching of service names to port numbers – to see the list simply type in:

nft describe tcp dport

Once you’re happy with them working make them permanent with copying them to the standard place (enabled on reboot):

sudo cp /etc/nftables.conf /etc/nftables.conf.default
sudo cp nftables.conf /etc/nftables.conf

Install Nextcloud

Install php

Start by installing php with:

sudo apt install -y apache2 mariadb-server libapache2-mod-php php-gd php-json php-mysql php-curl php-mbstring php-intl php-imagick php-xml php-zip php-apcu

Prepare MySQL (MariaDB)

To initialize the MariaDB database start with:

sudo mariadb_secure_installation

and answer the questions accordingly (e.g. remove anonymous user). Now the database is ready and we create a nextcloud-user in mysql: Log into MariaDB database server with the following command:

sudo mariadb -u root

Then create a database for NextCcoud using the MariaDB command below. This name of the database could be nextcloud (but one can use whatever name is prefered). Note: Don’t leave out the semicolon at the end.

> create database nextcloud;

Then create a new user.

> CREATE USER nextcloud@localhost IDENTIFIED BY 'your-password';

Again, you can use your preferred name for this user. Replace ‚your-password‘ with your preferred password (leave the single quotes in place):

> GRANT ALL PRIVILEGES ON nextcloud.* TO nextcloud@localhost IDENTIFIED BY 'your-password';

The above command will create the user and grant all privileges. Now flush MariaDB privileges and exit:

> FLUSH PRIVILEGES;
> exit;

Install Nextcloud package

To download the files, first get the download link in a browser (on nextcloud.com, download section, server packages), copy the link and then use the wget command (note that the actual filename will change once new versions of nextcloud will be released):

wget https://download.nextcloud.com/server/releases/nextcloud-x.y.z.zip

and download the checksum (just add „.sha256“ to the above download command):

wget https://download.nextcloud.com/server/releases/nextcloud-x.y.z.zip.sha256

and check it with:

sha256sum -c nextcloud-x.y.z.zip.sha256

and then unzip the downloaded nextcloud package, copy it to the webserver directory and change the ownership:

unzip nextcloud-x.y.z.zip
cp -r nextcloud /var/www
sudo chown -R www-data:www-data /var/www/nextcloud/

Enable the apache webserver

First, lets tell apache to list on which IP addresses and which ports:

sudo nano /etc/apache2/ports.conf

and fill it with something along (but change to your local IP addresses):

Listen 127.0.0.1:80 http
Listen 192.168.200.42:80 http


<IfModule ssl_module>
	Listen 127.0.0.1:443 https
	Listen 192.168.200.42:443 https
</IfModule>

<IfModule mod_gnutls.c>
	Listen 127.0.0.1:443 https
	Listen 192.168.200.42:443 https
</IfModule>

Next we create a config file for our actual nextcloud instance

sudo nano /etc/apache2/sites-available/nextcloud.conf

and paste in:

ServerName abc.mynet

<VirtualHost 127.0.0.1 192.168.200.22>
        ServerName abc.mynet
        ServerAlias h72qy8dg3rhd55rn7u3zkaibw4598dupq544wrlqsmx4d3oxjxvuurad.onion
        DocumentRoot /var/www/nextcloud/
</VirtualHost>


<Directory /var/www/nextcloud/>
  Options +FollowSymlinks
  AllowOverride All

 <IfModule mod_dav.c>
  Dav off
 </IfModule>

 SetEnv HOME /var/www/nextcloud
 SetEnv HTTP_HOME /var/www/nextcloud

</Directory>

To let apache check the config for errors use:

sudo apache2ctl configtest

Finally, enable this new config together with two required apache modules:

sudo a2ensite nextcloud.conf
sudo a2dissite 000-default.conf
sudo a2enmod rewrite
sudo a2enmod headers
sudo a2dismod status

Before actually activating the new config we apply a few more things. First some additional measures to improve anonymity:

sudo nano /etc/apache2/conf-enabled/security.conf

and change it so it shows these two configs:

ServerTokens Prod
ServerSignature Off

Finally activate all changes by restarting apache:

sudo systemctl reload apache2

Fire up nextcloud

Configuration

To connect to the database just point your webbrowser to your new nextcloud server and complete the installation wizard. This also creates the basic config file for nextcloud which we also need to change manually a bit:

sudo nano /var/www/nextcloud/config/config.php

One should add additional so-called trusted domains; here we want to add out onion web-address. To get your new onion address look it up here:

sudo cat /var/lib/tor/services/nextcloud/hostname

so with a few other addional tweaks, part of your config file (not a complete example!) might look like:

  'trusted_domains' => 
  array (
    0 => 'localhost',
    1 => '127.0.0.1',
    2 => '192.168.202.44',
    3 => 'xxx.bet',
    4 => 'h9dfype6yrhd55rn7u3dk7ebwhhkgospq544wrlqsmx4d3oxjxvuur99.onion',
  ),
  'overwrite.cli.url' => 'http://xxx.bet',
  'memcache.local' => '\OC\Memcache\APCu',
'htaccess.RewriteBase' => '/',
  'trashbin_retention_obligation' => 'auto,90',

Php configuration

The php config should be changed to e.g. accept uploads of larger files (note that the php version number might be different):

sudo nano /etc/php/7.3/apache2/php.ini

and change (search for the options in this very lengthy config file):

memory_limit = 512M
post_max_size = 256M
upload_max_filesize = 256M

crontab

You might improve a bit on the nextcloud performance by using cron:

sudo crontab -u www-data -e

and add at the very bottom:

*/15  *  *  *  * /usr/bin/php -f /var/www/nextcloud/cron.php

Finally, log into nextcloud and on the admin panel enable cron.

Update Nextcloud

Although there is a possibility to update your Nextcloud instance via the web frontend this might be failing in same cases due to time-outs. The safer approach is to simply run:

cd /var/www/nextcloud/updater
sudo -u www-data php ./updater.phar

on the command line interface of your machine.


Backup using rsync

Many people tend to ignore how important it is to have regular backups of their data until something bad happens and their stuff is gone for good. The good news is that on Linux there is an easy way to automatically create regular backups (it should work on other systems like Windows as well with some tweaking). One can even keep some of the backups for a very long time which might come in handy if you recognize something was lost like months ago. The obvious option is to use the rsync program as basis for a remote backup system.

The rsync tool

Something very smart with rsync it that one can point it to a previous, already existing backup on the server (cf. the –link-dest option in the script below) and rsync will compare any file of the new backup to the data there. If a file is existing in the old backup already rsync will not transfer the file again, but simply hard-link to it on the server and therefore also (almost) not consume any additional storage.

Another advantage of rsync comes into play with huge files (think of videos or veracrypt containers): rsync compares a file to a previous version on the server on a block level and only transfers and updates the parts of the file that did change.

Prepare the storage

First of all to make backups you need some kind of external storage. Theoretically, you could make backups on the same machine but if that one’s lost, stolen or broken all is gone (it might be useful though to go back in time for data which was deleted or overwritten by mistake). The next best option is to have some external storage stick or drive which is manually connect to your computer to run manual backups from time to time.

The best option for normal (i.e. non-business critical) usage seems to be a small storage server (NAS) on the local network. A good and rather cheap option is for example a Raspberry Pi running OpenMediaVault connected with an external SSD.

Enable secure access (ssh)

The very first step is to enable the ssh service as such on the storage server (e.g. OpenMediaVault). How this is done exactly depends on the server but usually this should be installed and enabled by default. Otherwise just search around or there should be some documentation on the internet.

For an automated, unattended backup to another server we need to enabled ssh access based on cryptographical keys without the need to an interactive password.

The first step is to create the required keys on the device which will be backed up (your laptop for example):

ssh-keygen -t rsa

Answer all questions with return, i.e. keeping the defaults and don’t enter a password!

Next, we need to copy the public key which was just created from the device to the remote server where the backups will be stored (take your username and the name of your server) and enter your remote password when asked for it:

ssh-copy-id user@hostname

The private, secret key will always stay on your local machine; typically it will be stored in the directory .ssh.

Now give it a try to see if everything works out fine – just enter (again take your own user name and server name):

ssh user@hostname

You should be connected to your remote shell right away without any password requests. In case it shouldn’t work try the command with ssh -v or ssh -vv and check the output for an indication what might be wrong.

To make life a bit easier you might also want to configure some of your ssh connections so they will be easier to use. To do so, just open the config file with:

nano ~/.ssh/config

and enter your details as needed like below:

Host mediaserver mediaserver.alpha
    Hostname mediaserver.alpha
    User admin

Host storage
    Hostname storage.alpha
    User tom

There are tons or options that can be defined in this ssh config file – start out with man ssh_config to check them out.

Rsync backup (push to server)

You need to decide where to store the backup script on your device (typically a laptop nowadays) and a good idea is to create a dedicated directory in your home directory. It’s also wise to make it hidden, i.e. to start the name with a dot so it won’t be visible by standard and it won’t be backed up by the script.

mkdir ~/.rsync
cd ~/.rsync
nano backup.sh

and paste in the following while changing everything specific for your local environment and setup (e.g. path names, user name, maximum bandwidth, etc.):

#!/bin/bash

LOGFILE="${0%.*}".log

# To ensure only one instance of the backup-script is running we create a lock-dir first.
# The lock is removed automatically on exit (including signals).
if ! mkdir "${0%.*}".lock; then
    echo "Lock detected (either rsync still running or manually locked); backup aborted..."
    exit 1
fi
trap 'rm --recursive --force --one-file-system "${0%.*}".lock' EXIT

# In case anything is failing during execution we want to catch it here and stop the script.
# Unfortunately, the following doesn't work for commands within a 'if' query... !
trap 'echo "Error encounted while executing $BASH_COMMAND. Exiting..." >> $LOGFILE; exit 1' ERR

echo "Starting new backup..." $(date) > $LOGFILE

SOURCE="/home/tom/"
SERVER="tom@storage.alpha"
BACKUP="/mnt/backup/laptop/tom/latest"
TARGET="$SERVER:$BACKUP"

if ssh $SERVER "test -e '$BACKUP'"; then
    echo "Latest full backup still exists (not archived yet). Exiting..." >> $LOGFILE
    exit 1
fi

RSYNCOPTIONS="--archive --numeric-ids --one-file-system --exclude-from=.rsync/backup.exclude --link-dest=../hourly.0 --compress --bwlimit=400K --partial-dir=.rsync-partial --human-readable --stats" 

ionice -c2 -n7 nice -n 19 rsync $RSYNCOPTIONS "$SOURCE" "$TARGET.tmp" >> $LOGFILE

ssh $SERVER "mv '$BACKUP.tmp' '$BACKUP'"	# Put the backup in place, so it's marked as completed
ssh $SERVER "touch '$BACKUP'"			# Timestamp the backup

echo "Backup script completed..." $(date) >> $LOGFILE

and make it executable:

chmod u+x backup.sh

Last step for the backup  is to create a small file called backup.exclude which contains what will not be backed up. An example could be:

# Always exclude files and directories with the following endings
*.part
*.iso
*.img
*.log
*.bak
*.old
*.zip
*.7z
*.tmp
*.temp
*.core
*.lock
*.crdownload
*.mp4

# As an exception to the rule below we include the following hidden directories
+ .rsync/
+ .hades/

# Now exclude all hidden files and directories (starting with a dot) from the backup
.*

# Exclude temporary folders as well
*/temp/
*/tmp/

# And finally exclude any confidential files that might be mounted to this directory
Hades/

With these exclude filters everything (files and directories) starting with a dot in the name and all files ending on .part or .iso are excluded from the backup.

First of all you should try the backup manually; maybe with a rather small scope of files to backup (so it doesn’t run for hours while testing). To start the script, simply type

.rsync/backup.sh

in your home directory and check the log-file in the same directory and the backups on the server. Note: if the script is run by cron then the it will be run from your home directory, therefore the relative path to the exclude-file is relative to the home directory. If run from another directory the relative path to the exclude file must be changed accordingly.

Now run a full backup which easily can take many hours. Then manually rename that backup on the server from latest to hourly.0 and run the backup script again. This time it should complete within a few minutes at most. Check the new backup on the server and will find the hard-linked files there.

If everything looks fine one probably wants to run the script automatically like for example each hour. To enable this simply make in entry into crontab with:

crontab -e

and add the following line (or something similar) at the end of the file:

0 * * * * /home/tom/.rsync/backup.sh

In case you want to avoid the script to be running for some time simply create the lock manually (in the script directory):

mkdir backup.lock

You might want to check the log-file in the same directoy to see if everything is working as it should. And don’t forget to remove the lock in case you created it manually and you want to run the backups again:

rmdir backup.lock

If you want to lock the backup script quite frequently it might be a good idea to define alias commands for the locks.

Archive of backups

Usually, one also wants to keep a few of the backups for a longer time. This means that some of the older backups should be kept for the future. This is accomplished with archiving the backups which can be easily automated with the following shell script.

Connect to your storage (NAS) server and become root to save the script:

su
nano /root/backup-archive.sh

Now paste in the following – adjusting the path $BASE and a few other things maybe to your local setup and needs (don’t worry, the script looks much more complicated than it actually is):

#!/bin/bash

# To ensure only one instance of the backup-script is running we create a lock-dir first.
# The lock is removed automatically on exit (including signals).
if ! mkdir "${0%.*}".lock; then
    echo "Lock detected (either script still running or manually locked). Exiting..."
    exit 1
fi
trap 'rm --recursive --force "${0%.*}".lock' EXIT

# In case anything is failing during execution we want to catch it here and stop the script.
# Unfortunately, the following doesn't work for commands within a 'if' query... !
trap 'echo "Error encounted while executing $BASH_COMMAND. Exiting..."; exit 1' ERR

BASE="/mnt/backup/laptop/tom"

N=100	# Maximum number of backups per category

case $1 in
    hourly)
        if [ ! -d "$BASE/latest" ]; then
            echo "No new backup available to be archived (no folder 'latest'). Exiting..."
            exit
        fi
        # If the latest backup is identical to the previous one in 'hourly.0' then skip
        # the backup rotation. Exit status of 'diff' is 0 if inputs (directories) are
        # identical, 1 if they are different, 2 if there's any kind of trouble.
        if diff --recursive --brief --no-dereference $BASE/latest $BASE/hourly.0; then
            echo "Not rotating, since there are no changes in 'latest' since last backup."
            echo "Removing 'latest' so a new backup will be made."
            rm --recursive --force "$BASE/latest"
            exit
        fi
        rm --recursive --force "$BASE/hourly.8"
        for I in {100..0}; do
            if [ -d "$BASE/hourly.$I" ]; then mv "$BASE/hourly.$I" "$BASE/hourly.$((I+1))"; fi
        done
        mv "$BASE/latest" "$BASE/hourly.0"
        ;;
    daily)
        until [ -d "$BASE/hourly.$N" ]; do      # Keep at least hourly.0 for the hard links
            if (( $N == 1 )); then echo "No hourly backup available for daily backup. Exiting..."; exit; fi
            let N--
        done
        rm --recursive --force "$BASE/daily.5"
        for I in {100..0}; do
            if [ -d "$BASE/daily.$I" ]; then mv "$BASE/daily.$I" "$BASE/daily.$((I+1))"; fi
        done
        mv "$BASE/hourly.$N" "$BASE/daily.0"
        ;;
    weekly)
        until [ -d "$BASE/daily.$N" ]; do
            if (( $N == 0 )); then echo "No daily backup available for weekly backup. Exiting..."; exit; fi
            let N--
        done
        rm --recursive --force "$BASE/weekly.4"
        for I in {100..0}; do
            if [ -d "$BASE/weekly.$I" ]; then mv "$BASE/weekly.$I" "$BASE/weekly.$((I+1))"; fi
        done
        mv "$BASE/daily.$N" "$BASE/weekly.0"
        ;;
    monthly)
        until [ -d "$BASE/weekly.$N" ]; do
            if (( $N == 0 )); then echo "No weekly backup available for monthly backup. Exiting..."; exit; fi
            let N--
        done
        rm --recursive --force "$BASE/monthly.12"
        for I in {100..0}; do
            if [ -d "$BASE/monthly.$I" ]; then mv "$BASE/monthly.$I" "$BASE/monthly.$((I+1))"; fi
        done
        mv "$BASE/weekly.$N" "$BASE/monthly.0"
        ;;
    yearly)
        until [ -d "$BASE/monthly.$N" ]; do
            if (( $N == 0 )); then echo "No monthly backup available for yearly backup. Exiting..."; exit; fi
            let N--
        done
        for I in {100..0}; do
            if [ -d "$BASE/yearly.$I" ]; then mv "$BASE/yearly.$I" "$BASE/yearly.$((I+1))"; fi
        done
        mv "$BASE/monthly.$N" "$BASE/yearly.0"
        ;;
    *)
        echo "Invalid (or no) option. Exiting..."
        ;;
esac

It must be invoked by giving an argument (either hourly, daily, weekly, monthly, or yearly) depending on what level of backups should be archived.

Once you confirmed it’s working by running it manually a few times the best practice is to invoke it automatically and regularly by setting up crontab. The different levels of rotations should be run at different daytimes, e.g. run the yearly one at 3:10 am (once a year), the monthly one at 3:20 am (once a month) and so on. The hourly rotation should be scheduled a few minutes before the new backup on the laptop runs – e.g. run the hourly rotation at 10 mins before the top of the hour if the backup script on the source device (laptop) runs at the full hour.

Just one example for cron (setup via sudo crontab -e):

20 * * * * /root/backup-archive.sh hourly
25 3 * * * /root/backup-archive.sh daily
30 4 * * 1 /root/backup-archive.sh weekly
35 4 1 * * /root/backup-archive.sh monthly
40 4 1 1 * /root/backup-archive.sh yearly

Retrieve files

Retrieving documents from the backup is quite easy. Simply use a command like the following (maybe first switch to a separate local directory first):

mkdir retrieve
cd retrieve
nice rsync --protect-args --archive --numeric-ids --progress tom@storage.alpha:/mnt/backup/laptop/tom/hourly.4/Lyrics/Elvis.pdf .

Obviously, the above rsync command needs to be adapted to the specific setup (user name, host name, path, file to retrieve, etc.) and one could also limit the bandwidth just like in the backup script. To download a whole directory just provide the name of the directory without trailing slash and no wildcards (star, question mark).

Alternatively, one could mount the whole backup to the local machine via sshfs. You can mount your backup to a local, existing folder called backup with something like

sshfs tom@storage.alpha:/mnt/backup/laptop/tom/ ~/backup -o idmap=user -o uid=$(id -u) -o gid=$(id -g)

To see your mouted drives and the backup use the df command.

Just in case there are directories contained which were encrypted with gocryptfs, you can decrypt them with (assuming the directory decrypt already exists):

gocryptfs -ro ~/backup/'my backup' ~/decrypt

Once done you can unmount your directories (either gocryptfs or sshfs) with:

fusermount -u ~/backup

Final thoughts

This backup setup and the two shell scripts are quite simplistic and in no way elaborated – but the whole thing just works. It’s also worth mentioning that there are applications around that effectively implement something pretty similar; one example being the ‚rsnapshot‘ tool. Personally, I prefer to do it myself though as this gives much more flexibility control, I can learn something – and it’s just plain fun to see it working.


DynDNS mit Strato und Fritzbox

Wer eine dynamische, d.h. eine sich hin und wieder ändernde, IP Adresse für seinen Anschluss hat, steht häufig vor dem Problem, diese IP Adresse zu kennen, um beispielsweise auf Dienste hinter dieser Adresse zugreifen zu können. Das könnten eine Webseite oder ein VPN Dienst zuhause sein. Für diejenigen, die eine Fritzbox als Router nutzen und Domains bei Strato registriert haben, gibt es eine relativ einfache Lösung (sicherlich oft auch ganz ähnlich mit anderen Routern und anderen Domain-Providern machbar).

Noch ein Hinweis: wer nur DS-Lite an seinem Internet-Anschluss bekommt, hat leider Pech gehabt, da dann prinzipiell keine Verbindung von außen über IPv4 möglich ist – da hilft nur noch auf IPv6 umzusteigen (oder den Anschluss zu wechseln).

Folgendes muss für den einfachen Zugriff über eine Domain auf die dynamische IP Adresse eingerichtet werden:

Bei Strato

Bei Strato meldet man sich in seinen Verwaltungsbereich an und geht in den Bereich der Domainverwaltung (zu finden unter Domains). Dort legt man sich zuerst eine separate Subdomain für das dynDNS an; das könnte beispielsweise so etwas wie

dyndns.mydomain.net

sein.

Danach muss dynDNS für diese neue Subdomain aktiviert werden – das geht unter: Subdomain verwalten → DNS Verwaltung → Dynamic DNS verwalten. Hier muss man dann folgendes auswählen: DynDNS Status: DynDNS aktiviert.

Auf der Fritzbox

Jetzt gilt es auf dem Router einzurichten, dass er die eigene IP Adresse an Strato sendet (die dort dann auf die Subdomain abgebildet wird). Das geht unter: Internet → Freigaben → Dynamic DNS. Dort setzt man folgendes (die Angaben müssen für die Domains etc. natürlich entsprechend angepasst werden:

  • Dynamic DNS: Haken (ja)
  • Dynamic DNS-Anbieter:
    Benutzerdefiniert
  • Update-URL:
    https://dyndns.strato.com/nic/update?system=dyndns&hostname=mysubdomain.mydomain.net&wildcard=OFF&backmx=NO&offline=NO
  • Domainname:
    mysubdomain.mydomain.net
  • Benutzername:
    mydomain.net
  • Kennwort:
    Strato-passwort

Voilà

Danach kann man über mysubdomain.mydomain.net (ersetzt durch die eigene Subdomain) direkt auf die dynamische IP Adresse zugreifen. Überprüfen kann man das auf Windows mit nslookup mysubdomain.mydomain.net und auf Linux mit host mysubdomain.mydomain.net – in beiden Fällen sollte nach ein paar Minuten die (sich hin und wieder ändernde) IP Adresse der Fritzbox angezeigt werden.

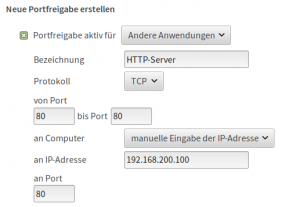
Je nachdem, was schlussendlich damit gemacht werden soll, muss auf dem Router natürlich noch eine Port-Weiterleitung auf den Service, den man nutzen möchte eingerichtet werden. Auf einer Fritzbox findet man die Port-Weiterleitung unter „Internet“, dann „Freigaben“ und schließlich der Reiter mit „Portfreigaben“: dort richtet man unter „Neue Portfreigabe“ das ein, was man braucht.

Port-Weiterleitung Fritzbox
Port-Weiterleitung auf einer Fritzbox

In diesem Beispiel würde der TCP-Port 80 der aus dem Internet auf der Fritzbox ankommt an den Server im lokalen Netz mit der IP-Adresse 192.168.200.100 (man kann alternativ aber auch einen Rechnernamen auswählen) wiederum auf den Port 80 des lokalen Servers weitergeleitet.