If you want to support the Tor project and you have some bandwidth to share (at least 10 Mbps in both directions, i.e. download and upload) you should consider hosting a Tor Relay. It can be done quite easily with a Raspberry Pi or any similar hardware as described below.
Our assumption is that we connect the Raspberry Pi with an ethernet cable to our ISP router and that we have a wireless LAN running for our private, local machines already. We will connect the Raspberry Pi to this WLAN for administration purposes (so this is not done over the internet connection on eth0).
Initial Setup as a Server
The very first step to start out is to get a new Raspberry Pi and do the basic setup as a headless server (described in a separate post). For the sake of increased security you shouldn’t use it for anything else than just to run the Tor Relay, so the Raspberry Pi should be dedicated to this task.
Install Tor and configure it
Let’s start with installing tor first:
sudo apt update sudo apt install -y tor
To configure the tor service as a relay edit the config file:
sudo mv /etc/tor/torrc /etc/tor/torrc.default sudo nano /etc/tor/torrc
and enter something like (change the details to your setup as required):
NickName MyNewRelay ContactInfo myemail@example.org Log notice file /var/log/tor/tor.log AvoidDiskWrites 1 ExitRelay 0 ExitPolicy reject *:* ORPort 6080 IPv4Only RelayBandwidthRate 10 Mbit RelayBandwidthBurst 15 Mbit TransPort 127.0.0.1:9040 DNSPort 127.0.0.1:5300 AutomapHostsOnResolve 1 AutomapHostsSuffixes .onion,.exit VirtualAddrNetworkIPv4 10.10.0.0/16
Now let tor check if the above config file is correct:
sudo -u debian-tor tor --verify-config
The last line should say that everything looks fine.
The contact information is optional but might be quite handy for others if there should be something strange with the relay. It doesn’t have to be an email address but could be any kind of text.
In case you are running more than just one Tor Relay you have to also include a „MyFamily“ option in the config above and list all your key-fingerprints of your Tor Relays in each of the torrc config files. You get the fingerprint with sudo -u debian-tor tor –list-fingerprint and remember that there must be a $ (Dollar-sign) at the beginning of each fingerprint.
Port Forwarding on ISP Router
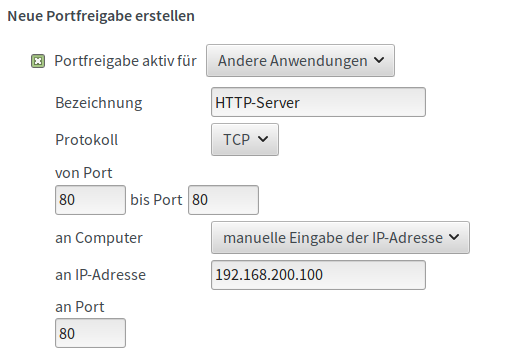
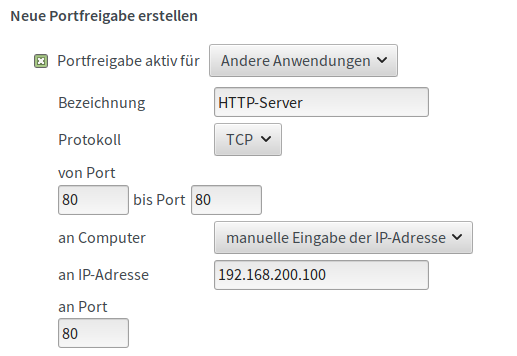
In our example the Raspberry Pi (our Tor Relay) sits behind a router which is the gateway into the internet (often provided by the ISP). With the tor configuration above we need to establish port forwarding on this internet router, so TCP traffic coming from the internet (on port 6080) is forwarded to the Tor Relay (on the same ports).
If you would like to use other ports to the outside world (internet) than on the Tor Relay server itself, the Tor config file (torrc) needs to have something like:
ORPort 80 NoListen ORPort 6080 NoAdvertise
The port forwarding on the ISP router then obviously has to forward port 80 to port 6080 on the Tor Relay.
The ports chosen are kind of arbitrary and we are free to take whatever we like. One advantage of advertising (i.e. using) ports 80 towards the internet is that they are very unlikely to be blocked as they are usually taken for http and https traffic. The drawback is that you can’t use these ports for something else (like a web-presence). Also some routers seem to have issues with port-forwarding these ports (e.g. lost after a router-reboot).
The details on how port forwarding is configured on the internet router depends heavily on that device but usually each of these kind of routers offers this feature somehow (just search the internet in case this is not obvious).
Start and Test it!
First let’s restart Tor (so it picks up the latest configuration):
sudo systemctl restart tor
Check the logs for what Tor does and if it complains about anything – the following commands might be useful to check for any errors:
sudo systemctl status tor.service sudo cat /var/log/tor/tor.log journalctl | grep Tor
You are perfectly fine if you see something like „Self-testing indicates your ORPort / DirPort is reachable from the outside„. If there are no issues your new Tor Relay will also become visible on the torproject metrics-webpage at metrics.torproject.org/rs.html (this might take a few hours though, so be patient).
One could also increase the level of logging information written by tor. Just change the option in the /etc/tor/torrc configuration file – after the „log“ statement one could place either debug, info, notice, warn, or err. Additionally, one could (temporarily, for debugging) turn off the scrubbing of sensitive information in the log-files as well. So for debugging include something like the following in the torrc
SafeLogging 0 Log info file /var/log/tor/tor.log
Once running fine one should probably keep the logging at the ’notice‘ level though.
Also note that it takes up to 2 months until a new Tor Relay gets fully used – and since there is not always traffic available it will mostly never really run at the full possible bandwidth. See this article for some background on it: blog.torproject.org/lifecycle-new-relay.
Enable the Firewall (nftables)
Enable the following firewall rules, starting with a config file in your home directory
sudo nano ~/nftables.conf
and paste in (ensure the port numbers of tor defined above match the firewall rules here!):
#!/usr/sbin/nft -f flush ruleset table ip filter { chain input { type filter hook input priority 0; policy drop; iifname lo accept ct state established,related accept ct state invalid drop tcp dport ssh ct state new limit rate 10/minute accept iifname eth0 tcp dport {6080, 6443} accept icmp type echo-request limit rate 1/second accept } chain forward { type filter hook forward priority 0; policy drop; } chain output { type filter hook output priority 0; policy drop; oifname lo accept ct state established,related accept ct state invalid drop skuid "debian-tor" accept oifname eth0 udp dport ntp counter accept oifname wlan0 tcp dport 8086 accept # sending measurements to influxdb oifname wlan0 udp dport domain counter accept # not needed ??? ip daddr 127.0.0.1 counter accept # not needed ??? ip daddr { 192.168.178.0/24, 192.168.200.0/24, 255.255.255.255 } accept } } table ip nat { chain input { type nat hook input priority 100; policy accept; } chain output { type nat hook output priority -100; policy accept; skuid "debian-tor" accept ip daddr { 192.168.178.0/24, 192.168.200.0/24 } accept tcp flags & (fin | syn | rst | ack) == syn counter redirect to :9040 # udp dport domain counter redirect to :5300 } }
and then activate these firewall rules with
sudo nft -f nftables.conf
One can check the applied firewall rules (and also see the counters) with
sudo nft list ruleset
In case something goes horribly wrong (e.g. you locked your own ssh session) you can hard reboot the server and will start without the firewall rules.
Note that nft
uses its own matching of service names to port numbers – to see the list simply type in:
nft describe tcp dport
Once you’re happy with them working make them permanent with copying them to the standard place (enabled on reboot):
sudo cp /etc/nftables.conf /etc/nftables.conf.default sudo cp nftables.conf /etc/nftables.conf
Setup dnsmasq
We use dnsmasq to handle all DNS requests initially since there we can configure which upstream server to use for which domains. In our case we use the (local, private) DNS server 192.168.200.1 on wlan0 to resolve our private domain and send everything else into Tor.
Install dnsmasq, save its default configuration for later reference and edit the config:
sudo apt install -y dnsmasq sudo mv /etc/dnsmasq.conf /etc/dnsmasq.conf.default sudo nano /etc/dnsmasq.d/dnsmasq.conf
and paste in:
# Configuration file for dnsmasq (DNS part, DHCP is disabled by default) #Optional logging can be enabled to support problem determination #log-dhcp #log-queries #log-facility=/var/log/dnsmasq.log # Listen on these IP addresses for DNS requests (always include localhost): listen-address=127.0.0.1 # Where to send DNS request to which can't be resolved locally. # Here we use the local Tor service listening on port 5300 (see /etc/tor/torrc) server=127.0.0.1#5300 server=/alpha/192.168.200.1 # The bind-interfaces directive instructs dnsmasq to bind only to # the network interface specified in the listen-address directive. bind-interfaces # The no-hosts directive instructs dnsmasq not to read hostnames # from /etc/hosts. no-hosts # Read hostname information from this file in addition addn-hosts=/etc/dnsmasq.hosts # Never forward plain names (without a dot or domain part) upstream domain-needed # Never forward addresses in the non-routed address spaces. bogus-priv # If you don't want dnsmasq to read /etc/resolv.conf or any other # file, getting its servers from this file instead, then uncomment this. no-resolv # If you don't want dnsmasq to poll /etc/resolv.conf or other resolv # files for changes and re-read them then uncomment this. no-poll # Set this if you want to have a domain # automatically added to simple names in a hosts-file. expand-hosts # Number of hostnames being cached in RAM for DNS lookups: cache-size=10000
and save the file. To test if the config for dnsmasq is free of errors check the syntax with:
sudo dnsmasq --test
We also need to disable that dnsmasq takes nameservers from resolvconf – edit the file
sudo nano /etc/default/dnsmasq
and uncomment the last line so it reads:
... IGNORE_RESOLVCONF=yes
Now start the dnsmasq service:
sudo systemctl start dnsmasq.service sudo systemctl status dnsmasq.service sudo systemctl enable dnsmasq.service
Finally do a few tests (abc is fine, server1 must be a valid hostname on your local network):
host -v cnn.com host -v abc.onion host -v server1.alpha
Some Improvement
Change Tor Repository
We can change the repository for the tor packages to their onion server:
sudo nano /etc/apt/sources.list.d/torproject.org.list
and change it to:
# Repository for the Tor packages: # deb https://deb.torproject.org/torproject.org buster main deb http://sdscoq7snqtznauu.onion/torproject.org buster main
However, Debian is not supporting anonymous and safe software repos by standard, so we need to enable it first – create a new apt config file:
sudo nano /etc/apt/apt.conf.d/80onion-repos
and put in just one line:
Acquire::BlockDotOnion "false";
Now finally update and upgrade the system with:
sudo apt update sudo apt upgrade -y
Automatic updates for Tor
It’s also recommended to get the tor software upgraded automatically. Assuming that the package ‚unattended-upgrades‘ is installed already, we simply need to add the updates from the torproject to the config:
sudo nano /etc/apt/apt.conf.d/50unattended-upgrades
and add the line with the TorProject repository:
... "origin=Debian,codename=${distro_codename},label=Debian-Security"; "origin=TorProject,codename=${distro_codename}"; ...
Sidenote: information about the ‚origin‘ and other parameters can be found in the files /var/lib/apt/lists/*_InRelease.
Monitoring
It’s good practice to regularly check the log files for errors for anything unusual:
sudo tail -25 /var/log/tor/tor.log sudo tail -f /var/log/kern.log
Also check the torproject metrics-webpage at metrics.torproject.org/rs.html from time to time which should give a sufficient overview of the Tor Relay status. If you can browse onion websites you could even use the onion-metrics site at: rougmnvswfsmd4dq.onion/rs.html.
In case a more in-depth monitoring is required have a look at e.g. vnstat, theonionbox or (most advanced, usually not really required and with lots of shortcommings) Telegraf with InfluxDB and Grafana.